
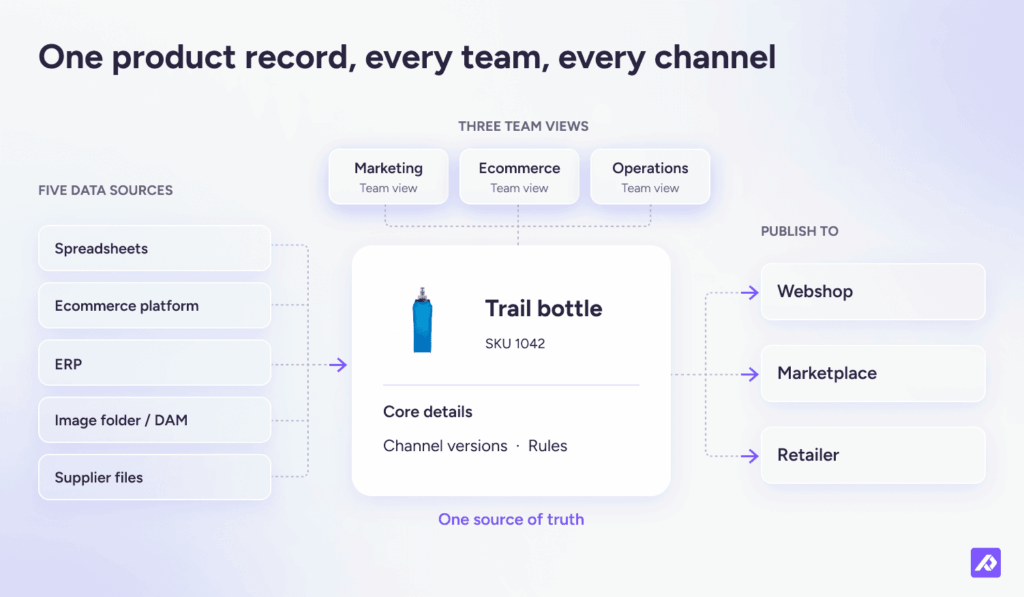
A PIM implementation brings your product data, digital assets, and the work around them into one place. Today, one product might get updated in a supplier file, the ERP, your store, and a retailer template. After implementation, each team works from one product record, and one change reaches every channel.
The simplest way to get there is one channel at a time, starting with your most important one. If you’re in the middle of a website or ERP migration, it’s also the best moment to start: you structure your product data once instead of migrating the mess twice.
I spent years as an Account Manager at Plytix, helping teams through PIM implementations, and I’ve seen where projects tend to get stuck. This PIM implementation guide shares what I’ve learned, from the first data check to getting your most important sales channel live without making the process bigger than it needs to be.
What is product information management implementation?
Product information management implementation is the process of moving product information, digital assets, and the workflows around them from your current systems into a PIM. Those systems are usually spreadsheets, an enterprise resource planning (ERP) system, an online store, and supplier files. Afterward, your teams edit, approve, and publish products from one record instead of several tools.
The work falls into four parts:
- Data modeling: setting up your product families, attribute groups, and categories.
- Data cleanup and migration: fixing your existing data and bringing it into the PIM.
- Channel mapping: matching your product data to what each channel expects, like Shopify metafields or a retailer’s Excel template.
- Workflows and approvals: moving who edits, reviews, and approves each detail into the PIM.
Your ERP stays the master for SKUs, price, and stock. What changes is where your team works on product content: one record, instead of the ERP, the store, and a retailer spreadsheet.
New to PIM? Start with the Plytix guide to product information management.
How long does PIM implementation take, and what does it cost?
Most teams get their most important sales channel live in 4-8 weeks when the first rollout is focused: one channel, a manageable product scope, and few custom connections. A broader rollout, with more cleanup or a second channel, commonly takes 8-12 weeks. Programs with several markets or custom integrations can take several months.
Scope drives the timeline more than SKU count does. A catalog with 20 attributes per product is a different project from one with 200. Every team, approval step, and integration you move into the PIM adds time, and so does every decision nobody owns yet.
Cost follows the same drivers. Implementation can range from $0 to $30,000 or more, depending on the tool and how complex your setup is. Where you land depends on how much data needs cleaning, how many systems need to connect, and whether you use a partner. Starting with one channel keeps the first spend small. The PIM pricing guide breaks down onboarding, migration, integration, and partner costs.
How can you estimate your own PIM implementation timeline?
Estimate your PIM implementation timeline from a sample of your products, not your SKU count. Review 20-30 products from each main product type, up to about 100 in total, including variants and messy records. Then sort what you find into four kinds of work:
- Structure: Which attributes, product families, variants, and channel-specific fields do you need?
- Bulk fixes: Which problems can you solve once with a mapping, import, or rule?
- Individual work: Which products need research, new content, or missing assets?
- Workflows: Which details get edited in more than one system, and who approves them?
Individual work takes the most time: enriching and publishing 100 products by hand takes 30-150 hours, according to Plytix’s 2026 Commerce Napkin benchmarks. Share your sample with vendors, so their timeline reflects your data.
How to implement a PIM system in five steps
To implement a PIM system, map your data and workflows, choose your most important channel, and decide where each detail comes from. Then plan your structure, migrate your data, and go live in batches before you add the next channel.
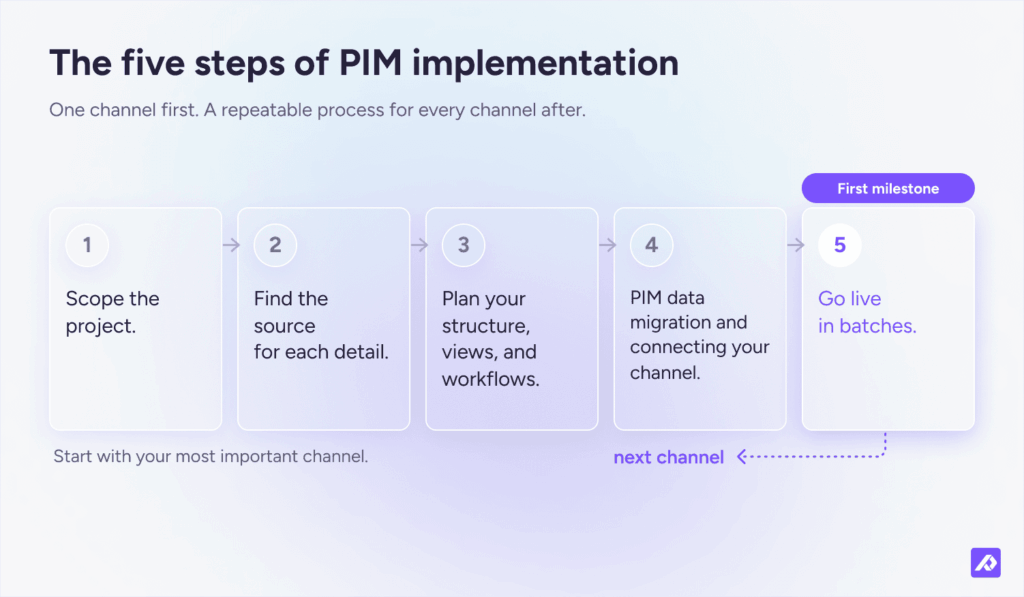
Step 1: Scope the project: map your data, workflows, and most important channel
Name one project owner who can make decisions. Then, with the people who work with product data every day, map three things:
- Comes from: your ERP or a master data sheet, supplier files, spreadsheets, your online store, and image folders or a digital asset management (DAM) system.
- Goes to: your online stores, marketplaces, feed management tools, and retailers.
- Edited in: every place someone changes product content today, including fixes made in your store after launch.
The map shows which systems need to connect and which edits happen twice. It also shows your most important channel: the one with the most products, variants, and languages. Start there, because it forces the big structure decisions early, and every channel after it goes faster.
Write the scope down: the channel, the product families it covers, the systems it connects to, who approves what, and a go-live goal, like “Get our 25,000 products live on Shopify with the right titles, specs, and images in three languages.”
Step 2: Find the source for each detail
Product data rarely lives in one file. Your ERP may hold the right SKU, barcode, and weight. Your online store may hold the best description, and a supplier file the materials.
Name one source for each detail. When systems disagree, use the one closest to where the value is created and kept up to date by the team that owns it. Those sources become your core details:
| Product detail | Best source today | PIM attribute | Field type |
|---|---|---|---|
| Item number | ERP | sku | Text |
| Barcode (GTIN) | ERP | gtin | Text |
| Net weight | ERP | weight_kg | Number |
| Long description | Online store | description | Rich text |
| Fabric | Supplier file | material | Multiselect |
| Main image | DAM or image folder | main_image | Image |
Step 3: Plan your structure, views, and workflows
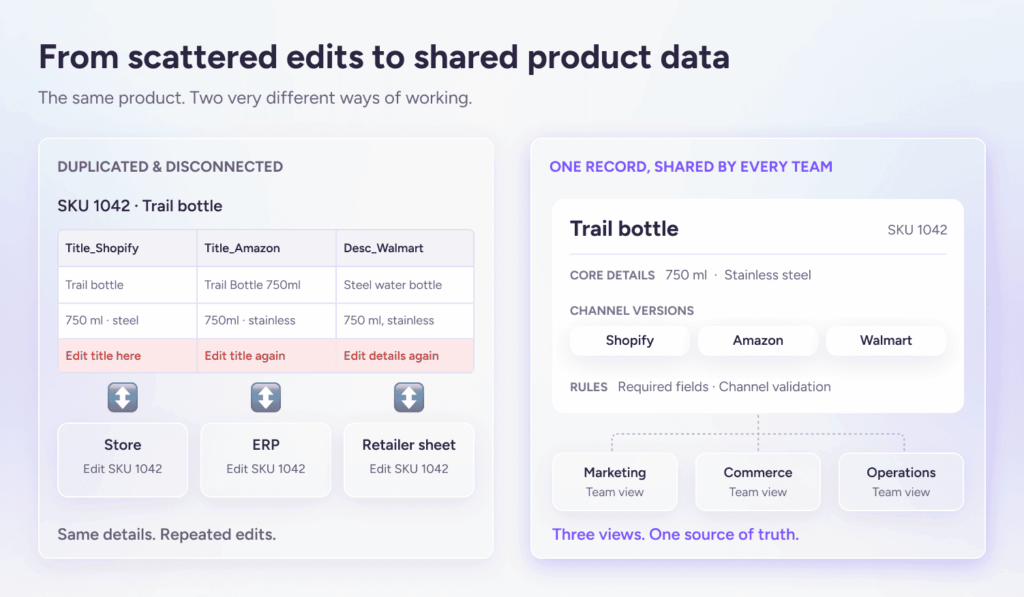
This is the hardest step, because it’s where a flat spreadsheet and a chain of handoffs become one structured system. In a spreadsheet, every new channel gets new columns: Title_Shopify, Title_Amazon, Desc_Walmart. In a PIM, you sort every detail into one of three kinds:
- Core details are the facts every channel shares, brought in once from their source.
- Channel versions cover channels that need a detail written differently, like a shorter marketplace title.
- Rules fill in anything you can work out from other data, like tagging any product over 30 kg as oversized freight.
Then give each attribute group an owner, and set up a view for each team. Everyone works on the same product record, but each team sees the fields it owns. A product launch then looks like this:
- Marketing adds the description and images.
- Operations adds weights, dimensions, and shipping details.
- Ecommerce reviews the channel versions in its own view and approves them.
- Once approved, the product publishes to every connected channel.
What to set up in your PIM:
- Product families decide which attributes apply to which products, like dimensions and fabric for sofas.
- Attribute groups keep related fields together. They’re also where you handle languages, so pick your source language first.
- Categories sort your catalog into a taxonomy, like Home > Kitchen > Cookware. Look for category fields that can import a full path like this, or several categories separated by commas.
- Automations handle repeat steps, like starting a translation or flagging a missing detail.
Step 4: PIM data migration and connecting your channel
PIM data migration, often called PIM migration, means moving your product data and digital assets from spreadsheets, an online store, or another PIM into a new PIM. Bring your core product facts, rebuild channel copies as channel versions and calculated fields as rules, and leave unused columns behind. Moving from another PIM is usually easier, since your data already has a PIM-style structure.
How to clean your data before you import:
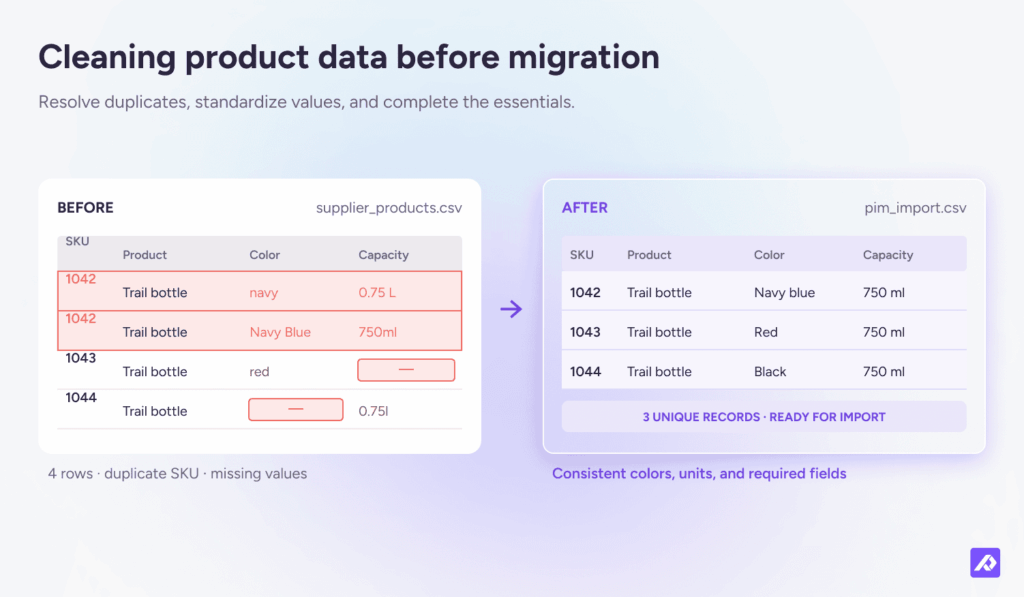
Clean your data before it goes into the PIM, so you fix each problem once instead of after every import:
- Remove what you don’t need: duplicate fields, old columns nobody uses, and products you no longer sell.
- Standardize values that mean the same thing, like color names or units, so filters and channel exports work.
- Keep your own SKU as the main product ID, so every import, supplier file, and channel matches products the same way.
- Back up your source files before each import, so you can go back if something lands wrong.
After each import, check the failure report. It should show which rows failed and why, so you can fix them at the source and import again. The Plytix guide to product attributes goes deeper on structure.
Ways to get data in:
There are five common ways to get product data into a PIM, and most teams use more than one:
- Spreadsheet import: for a first load or occasional updates. You upload a file and match its columns to your PIM attributes.
- Import template: for files you get regularly, like a supplier’s monthly sheet. It saves your column matching, so every file lands the same way.
- Import feed: for data that changes on a schedule. The PIM pulls in a file from a link automatically.
- API: for a custom connection to another system, like an ERP without a ready-made connector. This usually needs a developer.
- Direct integration: a ready-made connector to a system like your online store.
Once your data is in, match each attribute to the fields your channel expects.
Connecting your channel:
Connecting your channel means matching your PIM attributes to the fields the channel expects, then choosing how the data gets there:
- Map each attribute to the channel’s field, like your core title to the Shopify product title and a channel version to the Amazon item name.
- Choose how the data travels: a direct integration that syncs automatically, or an export file in the format a marketplace or retailer asks for, like their Excel template.
- Check what happens if a sync fails. You should be able to see which products failed and why, fix them in the PIM, and send them again.
Step 5: Go live in batches, then add the next channel
Sync a small batch to the channel first, covering your main product types, variants, and channel requirements. Have someone who knows your products check those listings like a customer would. Fix problems in the PIM, then push a bigger batch. If something goes wrong, you only roll back one batch.
Once the whole channel is live, train your team and stop editing that channel’s product content anywhere else. That’s your first milestone. Each channel after it mostly needs its own channel versions, because your core details and workflows are already in place.
PIM implementation best practices: how to avoid common problems
The best PIM implementations start with the most important channel, keep the structure lean, and move every team’s edits into the PIM. These are the mistakes I see most often:
- Launching every channel at once: Problems multiply and go-live slips. Finish one channel before you start the next.
- Keeping old edit points open: Teams fix a product in the store or a spreadsheet, and the PIM falls out of date. Once a channel is live from the PIM, make every change there.
- Leaving decisions without an owner: The same question comes back with every import. Give each attribute group an owner and write the rule down.
- Treating go-live as the finish line: New products bring new mess. Set completeness rules and review the catalog on a schedule.
To see how vendors compare on onboarding and setup, read the Plytix guide to the best PIM software.
What goes on a PIM implementation checklist?
Use this checklist as your PIM implementation plan. Each line is one task.
Before you start
- Name a project owner
- Map where product data comes from, where it goes, and where your team edits it
- Choose your most important channel
- Write down the scope and go-live goal
Plan
- Review a sample of your products
- Pick one source for each detail
- Sort fields into core details, channel versions, and rules
- Give each attribute group an owner
Build
- Set up product families, attribute groups, and categories
- Back up and clean your data
- Import your data and connect the channel
Go live
- Sync a small batch and check it
- Push the rest in batches
- Train your team
- Stop editing the channel’s content outside the PIM
Frequently Asked Questions
You can often implement a PIM yourself if your catalog is simple and someone has time to lead the work. A partner is useful for custom connections, complex data structures, or a rollout across several markets.
Your PIM implementation is working when products publish faster, with fewer errors, and nobody edits them outside the PIM. Track these measures against the goal you set in Step 1:
- Time to publish: how long it takes to get a product ready for a channel
- Completeness: how many products have every required detail
- Errors: how often wrong or missing details reach a channel
- Manual work: how much time your team still spends copying and fixing data
- Adoption: whether your team works in the PIM or still in spreadsheets
Yes, a website or ERP migration is one of the best times to implement a PIM. You’re already moving and checking product data, so structure it once in the PIM instead of migrating the mess twice. Your new site or ERP then starts with clean, organized product content.
A PIM implementation team needs one project owner who can make decisions, plus the people who work with product data every day. That usually means ecommerce, product data, and marketing. Bring in operations for weights and logistics, and IT once ERP or custom connections come up.
Often, yes: spreadsheet imports, import templates, and most channel exports don’t need a developer. You’ll need IT or a partner when you connect an ERP without a ready-made connector or build a custom API connection. Find out early which of your systems fall into that group.
Ask four things before you sign:
- Will they review a sample of your products before quoting a timeline?
- What setup help is included?
- Which of your systems have ready-made connectors?
- What costs extra after launch?
The answers show how much of the work will fall on your team.
Migrating from one PIM to another is usually easier than starting from spreadsheets, because your data already has a structure. Map your old attributes, families, and assets to the new PIM. Fix what didn’t work the first time, then move one channel over before you switch the rest.