Online sellers love Shopify—and for good reason. With over 2 million Shopify merchants, this ecommerce platform is loaded with features that make it easy for brands and retailers to showcase their products online.
While the platform is relatively easy to use and set up, the task of uploading and updating your store’s products isn’t the easiest of tasks (especially if you have a decent amount of inventory). If you’re working with hundreds (or even thousands) of products, you’re not going to want to manually add in or update each of those products—unless you like to suffer. 👀
One way to save yourself time is by importing your products in bulk with a CSV (Comma-Separated Values) file. While it still isn’t the fastest process to update your Shopify store, it will save you loads of time compared to manually uploading each and every product. To help you get this set up, we’ll walk through how you can import your products in Shopify with a CSV file.
How to set up your CSV file for Shopify
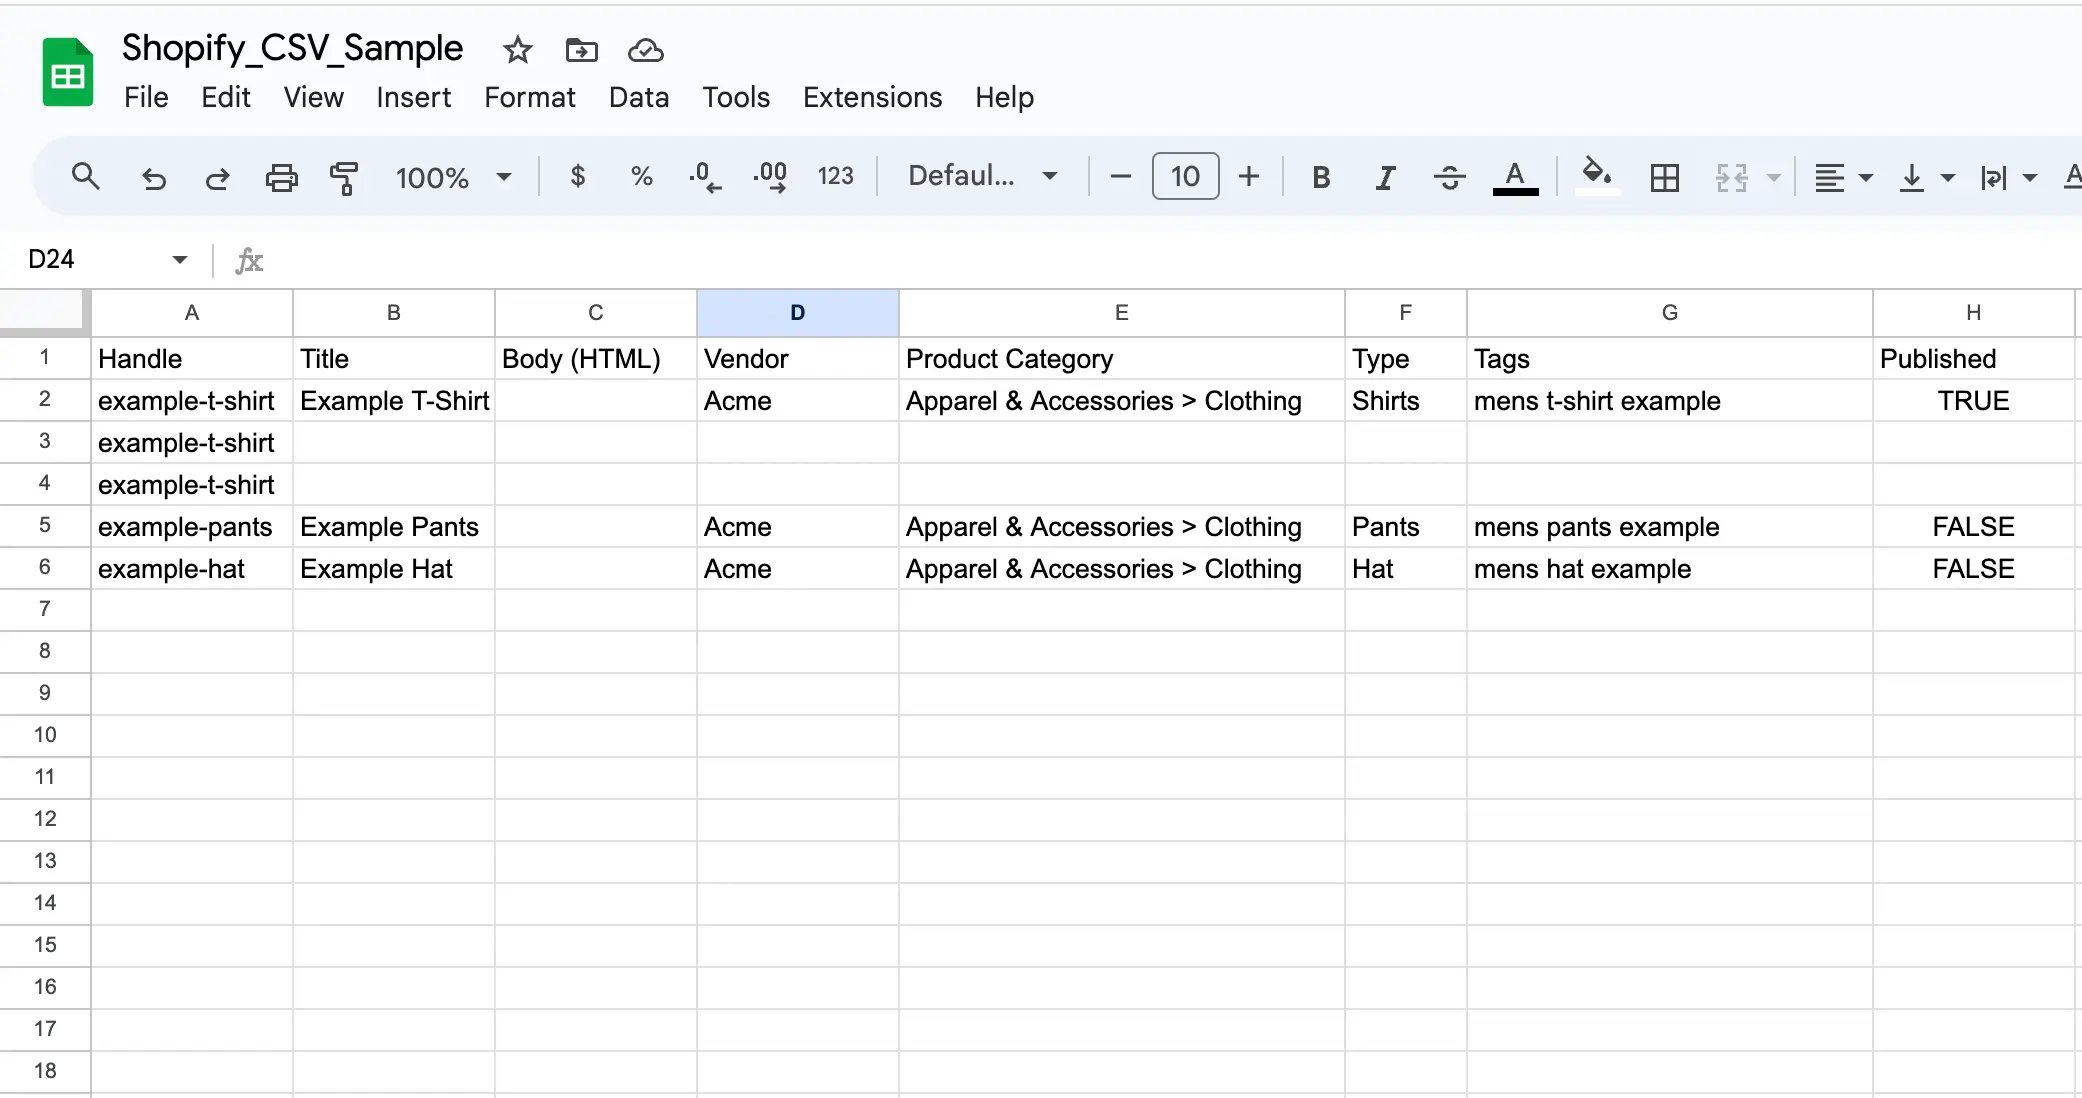
The first thing you’ll want to do is get your CSV file set up. You can download Shopify’s sample CSV file to get started. This file has a few product examples with all the different Shopify fields (or categories) that you can use to create your own Shopify CSV. From here, you’ll need to go in and fill in your product information. Just remember there are only two required fields: Handle and Title. The rest of the fields you can use to fit your product information needs, but make sure to use the right column name to avoid any issues or errors when uploading your products.
Basic Shopify product fields you'll want to include
While only the Handle and Title are required to
- Handle: This is the product's identifier; it typically mimics the name of the product.
- Title: The product's name (the one customers will actually see)
- Body (HTML): This is the description of the product. It can include basic HTML tags for formatting.
- Pricing information: How much the product costs (hopefully this one was obvious)
- Inventory information: Quantity of the product in stock
- Shipping information: Details on how the product will be delivered
- Variant information: Different versions or options for a product (e.g., sizes, colors)
- Product Status: Whether the product is available, sold out, or coming soon
- Vendor information: Who makes or supplies the product
- Product type: The category or classification of the product
- Collections: Groups or categories that the product belongs to
- Tags: Keywords or labels attached to the product for easy search and organization
This list doesn't cover every potential option, but it does cover the basics of what you'll want to include. For more information, make sure to check out Shopify's help center article that explains the different column options.
Note: It’s really important to get this right because if your information isn’t accurate, you’ll have issues uploading, or worse, you’ll have incorrect information on your store.
Step-by-Step: The Importing Process to Shopify
With your CSV file now prepared, importing becomes a breeze:
- Access Shopify Admin: Begin by logging into your Shopify dashboard.
- Product Navigation: Head over to Products > All Products.
- Look for the Import option and click on it.
- A dialog box will appear. Select Choose File and navigate to your CSV.
- Finally, click on Upload file.
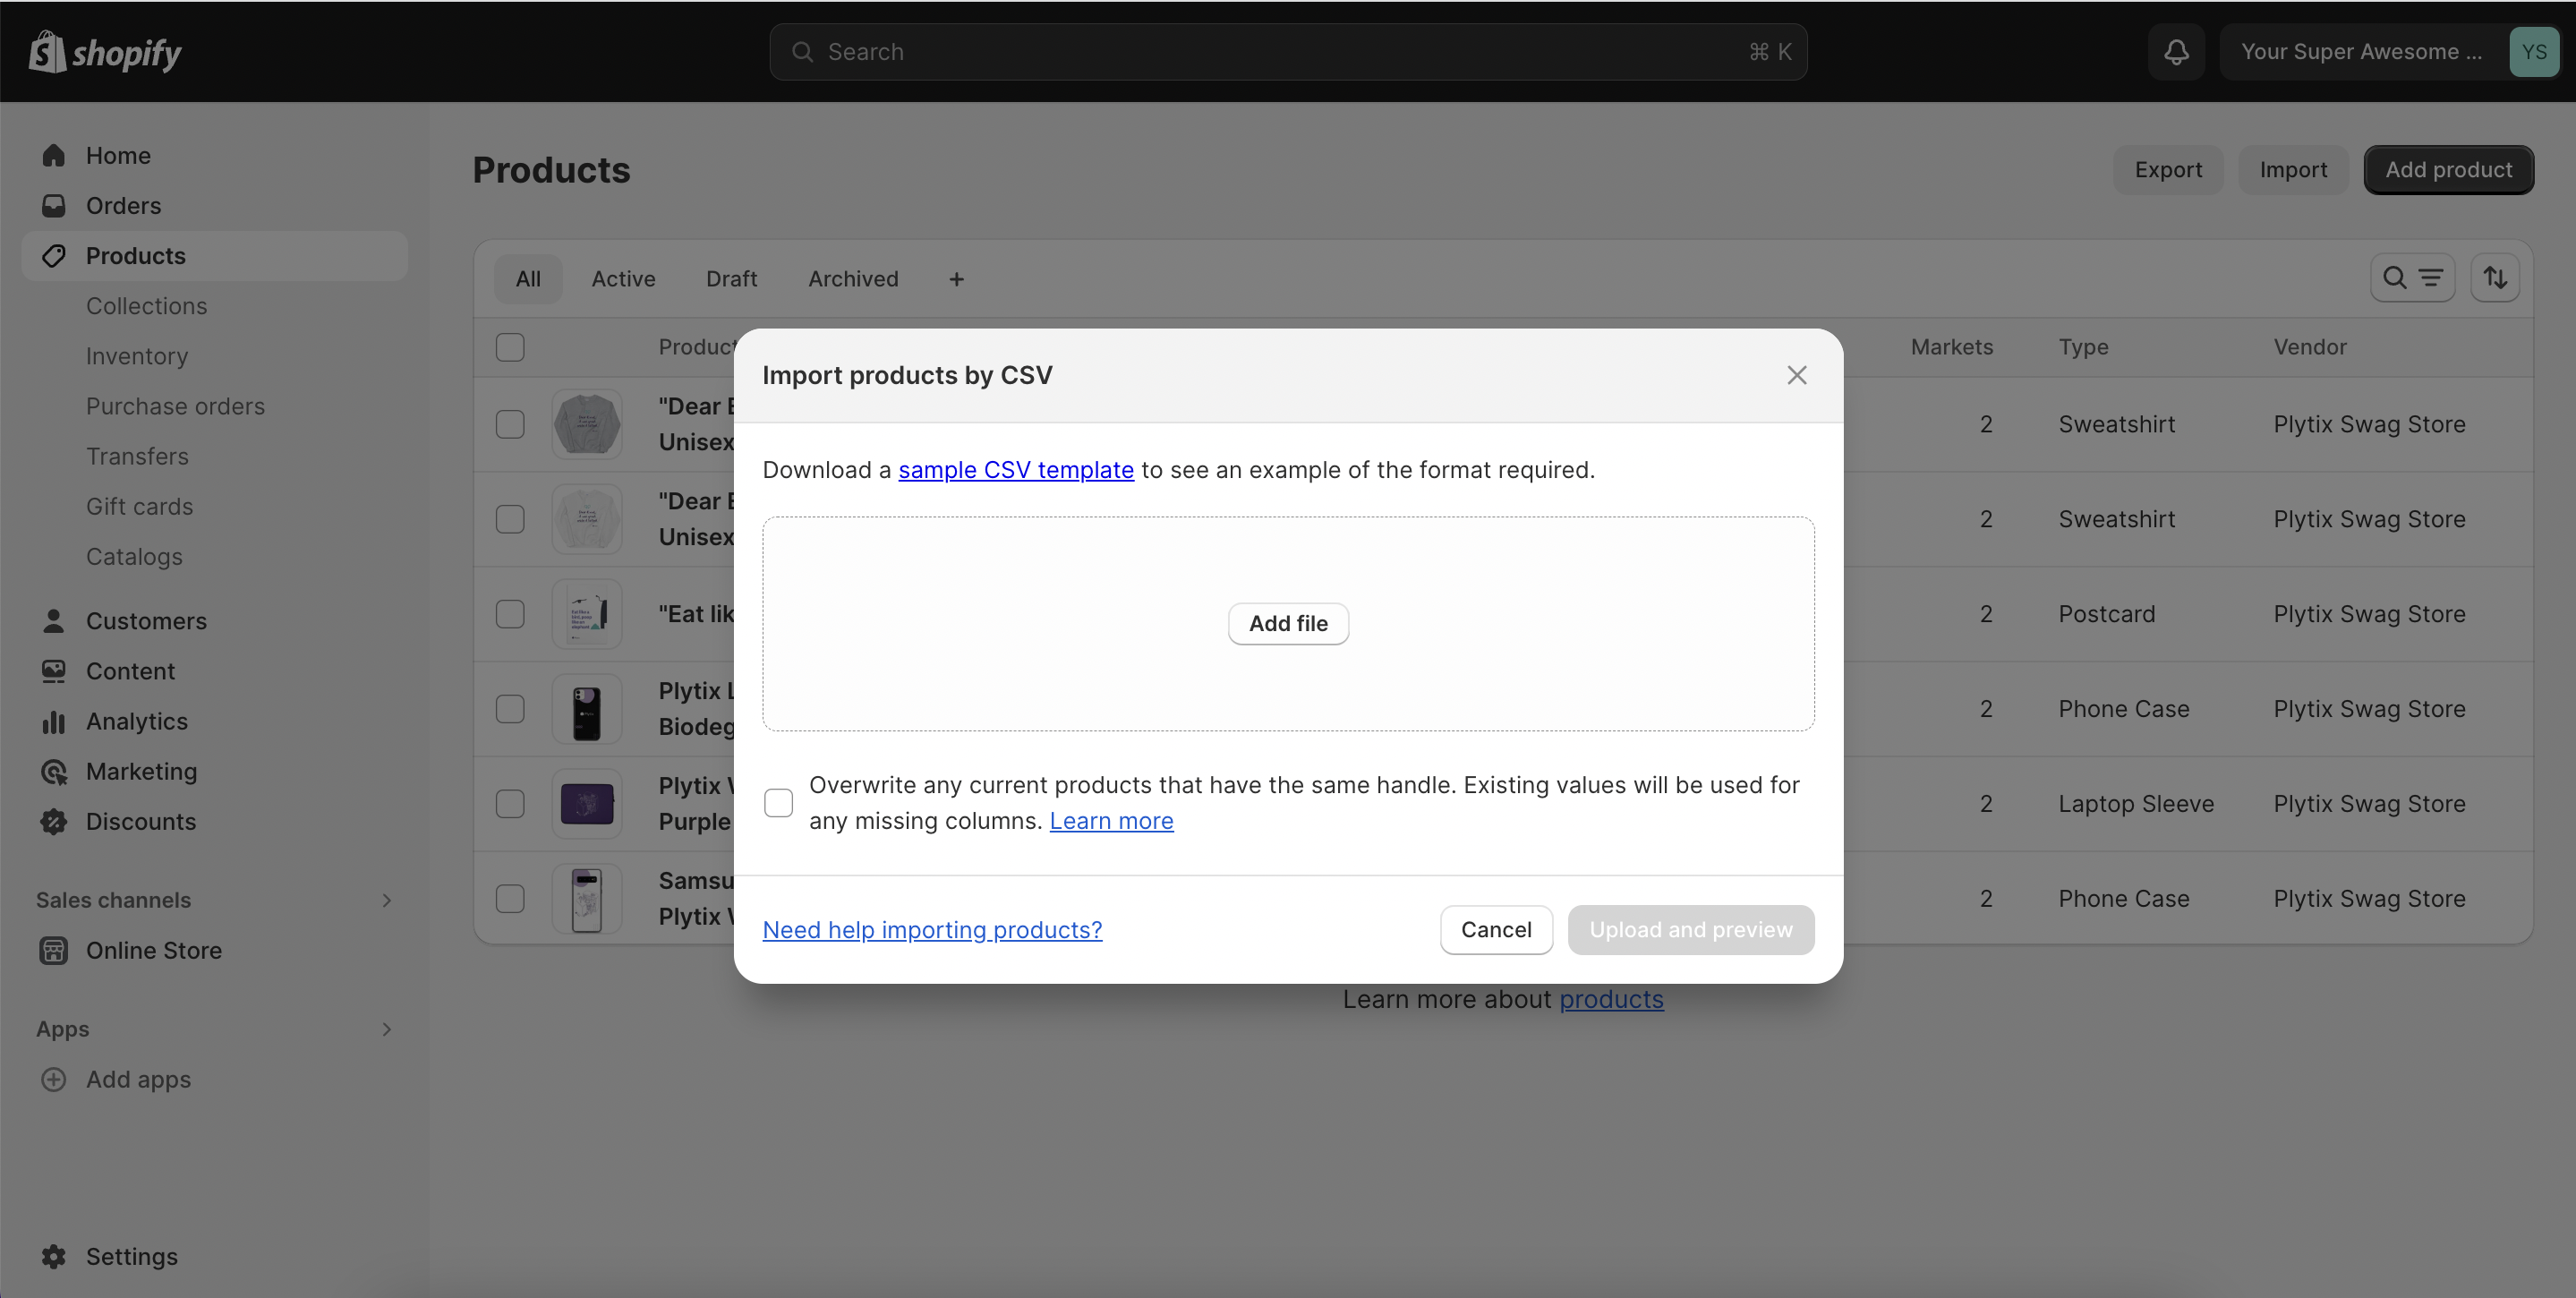
That's it! Shopify will now ingest the data, listing each product in the order they appear in your CSV. Depending on the sheer volume, it might take a bit, so perhaps grab a coffee.
Troubleshooting: Common CSV Errors
In the digital realm, challenges are part and parcel of the journey. If there's a hiccup with your CSV file, Shopify will flag it, typically with an error message. Some typical errors include:
- Field Missteps: Forgetting mandatory fields can halt the process.
- Data Discrepancies: Data that doesn't match Shopify's expected format can cause hitches.
- Duplication: Unique fields like "Handle" should never have duplicates.
Always address these issues promptly. Tweaking your CSV and re-uploading will get things back on track.
CSV Importing Best Practices
- Backup First: Always keep a backup of your existing product data. This provides a safety net should things go south.
- Visuals Matter: If your CSV includes links to product images, ensure these are publicly available. Broken or inaccessible links can mean products sans images.
- Variants: Products often come in different sizes, colors, or other variables. Ensure these are categorized correctly under product variants.
- Consistency is Key: Uniformity in data presentation, like decimal places or date formats, is essential. This ensures seamless data interpretation by Shopify.
If you're managing products across multiple sales channels, using our Shopify PIM integration can make the process even easier. Plytix PIM integrates seamlessly with Shopify and helps centralize your product information, which will help ensure your data stays consistent, accurate, and easy to update across all platforms. On top of that, it will also save you time and reduce errors when managing your store's inventory.
Looking Beyond the Import: Optimization
After importing, it's a good idea to review your product listings. Ensure images load correctly, descriptions appear as intended, and there are no discrepancies in pricing. This post-import audit ensures a smooth shopping experience for your customers. Additionally, optimizing product descriptions for SEO, integrating reviews, and tagging products appropriately can elevate the user experience.
Wrapping Up
The CSV import method is a game-changer for ecommerce professionals. It's efficient, reduces errors, and lets you populate vast inventories in record time. As you blend marketing with IT on Shopify, mastering the CSV approach means you have more bandwidth to engage with customers, strategize, and grow your online footprint. In the vast ocean of ecommerce, every efficiency counts.


Bergen Palmer
Bergen Palmer is a content marketer at Plytix, where she writes all about product information and ecommerce. With a background in ecommerce SaaS and content strategy, she focuses on creating clear, trustworthy content that helps brands work better with their product data.
What if your product data actually worked for you?
We’ll show you how Plytix helps you stop fixing data—and start using it.


Think others should see this?
Go ahead and share it.