
Keep the good stuff coming
Subscribe to our blog newsletter and get monthly content that helps you manage product data smarter.
No spam. Just real value.
Staying on top of your product information when it’s scattered around a bunch of different spreadsheets is a massive hassle, especially when you’re dealing with different formats and naming conventions in each one.
That’s why getting all that information into one place is going to make your life a lot easier, which is what we’re going to look at in this article—how to merge product information from multiple spreadsheets.
I’m using Google Sheets here, but to learn about this process in Excel then you can also watch the video guide below. There are other apps and software you can use to manage your data efficiently too—but I’ll save more details about that for the end.
There are different steps and methods for this process within Google Sheets, each with their own pros and cons. If you already know what information you’re looking for then feel free to skip ahead to the part that’s relevant to you (I won’t be offended, promise). If you’re not sure where to start though, then don’t worry—just sit back, relax, and read on.
What you need to know and do before you get started
Before we dive on into the merging topic, there’s a little bit of housekeeping we need to do. We’re going to clarify a few terms you need to know, and then there’s also a file format question to resolve. Let’s get things sorted.
Terms you need to know: A Google Glossary (Googlossary?)
Google Sheets can get a bit confusing, in that the term “sheet” appears all over the place and it’s not always clear what it’s referring to. It’s actually relatively simple though. When working in Google Sheets, you’ll find that:
- Spreadsheet = an entire file
- Sheet = one tab or part of a file
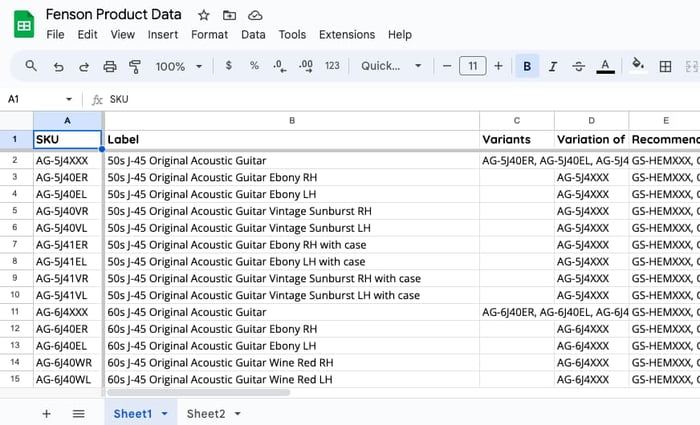
A spreadsheet called “Fenson Product Data” containing two sheets, Sheet1 and Sheet2.
To help keep things consistent and clear, there are also some other words and phrases that I’m only going to use in a specific way within this guide. For the purposes of this guide:
- Method = a general way to do something (this guide goes over two methods for merging spreadsheets, for example)
- Function = a particular action within Google with a specific name, like “Save,” “Open,” “Find and replace,” and so on
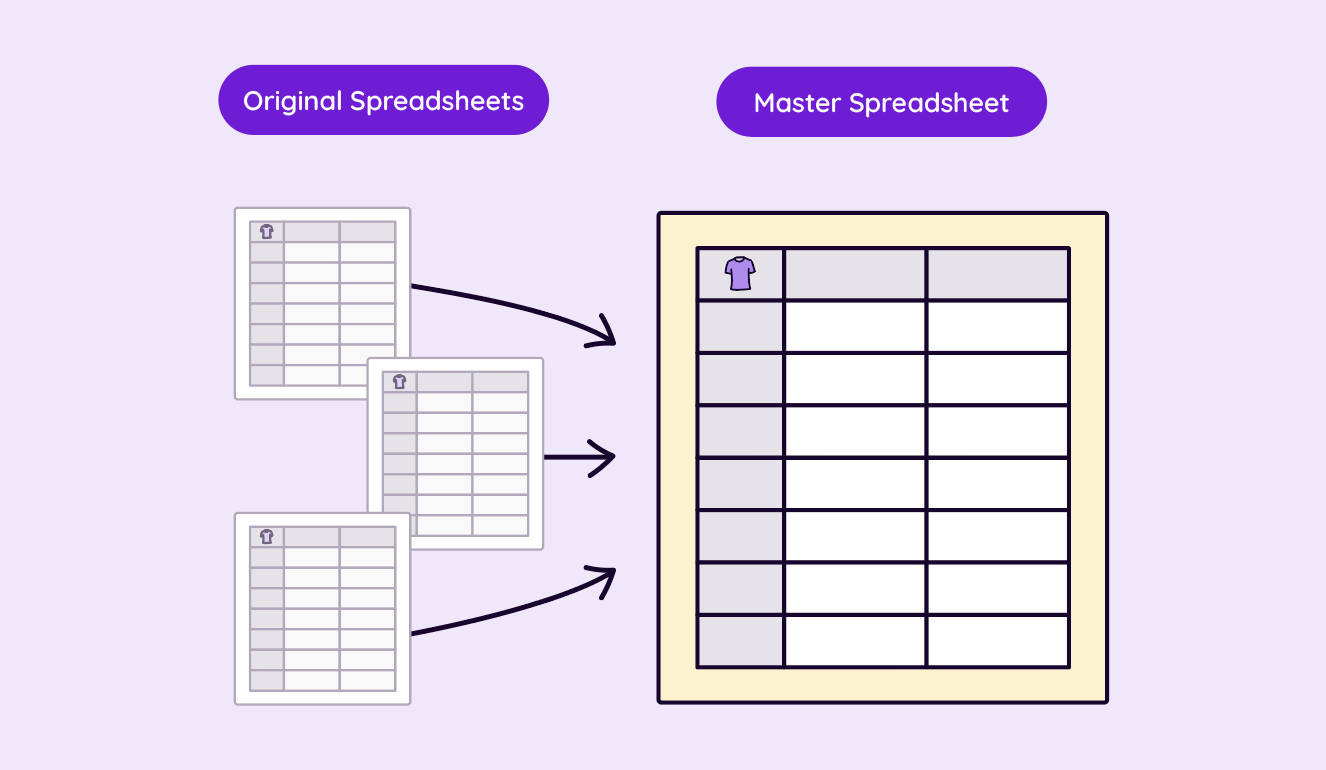
- Master spreadsheet = the spreadsheet you’re attempting to copy/import data into, which you ultimately want to have as your central spreadsheet containing information from all your other spreadsheets
- Original spreadsheet = one of the spreadsheets you’re attempting to copy/import data from
Getting your files into the right format
Hopefully, your suppliers, vendors, and everyone else providing you with product information are already using spreadsheets in CSV or another similar format. These formats can be read by most data management software and systems, which is necessary for the following steps. If not though, you’ll need to get your data into a format that’s compatible with whatever system you’re using—in the case of Google Sheets, CSV and TSV tend to have the fewest issues.
There are apps and websites that can convert your files for you, but if you’re unable to find a software solution then you may have to simply copy and paste your data into a new spreadsheet yourself, and then store that spreadsheet wherever you store the rest of your information.
The two main methods to merge spreadsheets
Basically, you've got two ways of merging spreadsheets:
- Copying product information from an original spreadsheet into your master spreadsheet and creating a separate copy of its data there—you can then edit and do what you want with that copy.
- Linking an original spreadsheet to your master spreadsheet so you can see a constantly updated reflection of its product information there. This way means you cannot edit that data unless you go back to the original spreadsheet.
We’re now going to get into how and why to use each method in Google, starting with copying all your data into one master spreadsheet.
Method 1: Making a copy
In Google Sheets, you can do this using the “Import” function or the “Copy Sheet” function.
Using Google’s “Import” function to copy data into a master spreadsheet
Starting from your master spreadsheet, your first step is clicking “File” and then “Import” there.
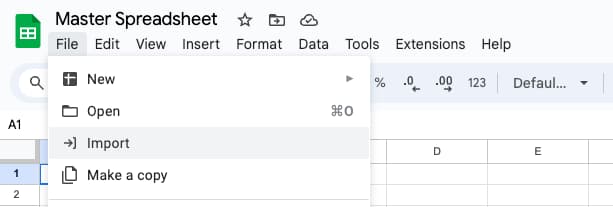
If the original spreadsheet you want to copy data from is already being hosted somewhere on Google Drive, then you can find it through the tabs on the left, searching for it, or by pasting in the file’s URL. If the spreadsheet is on your computer, then there’s the option to upload it on the right:

There are then different options to choose from at the moment of import, with the exact options available varying slightly depending on the format of your original spreadsheet. These options are relatively self-explanatory, and each one has its own use cases.
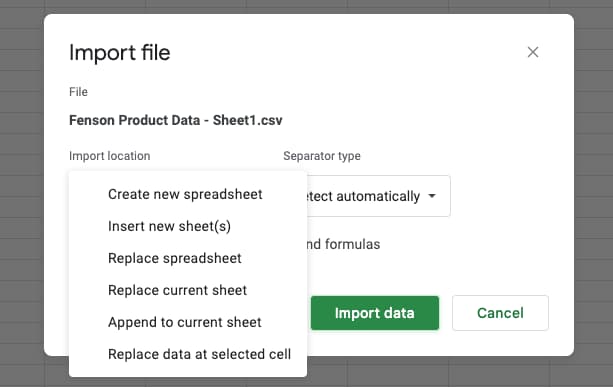
If you’re importing data from various spreadsheets with different formatting situations, the simplest option is generally to choose “Insert new sheet(s)” for each upload. That way, each of your original spreadsheets will be added as its own sheet in your master spreadsheet, making it easy for you to switch between them while staying in one place.
If everywhere you’re extracting data from has the same formatting and naming conventions, though, you may want to combine everything in one sheet straight away—it depends on your setup and whoever else is providing you with product information.
Using Google’s “Copy Sheet” function to copy data into a master spreadsheet
To use the “Copy Sheet” function, you first need to get everything into Google Sheets, both your master spreadsheet and your original spreadsheet (after getting your files into the right format, of course).
Once that’s done, click the arrow on whichever sheet you want to copy, then “Copy to,” then “Existing spreadsheet.”
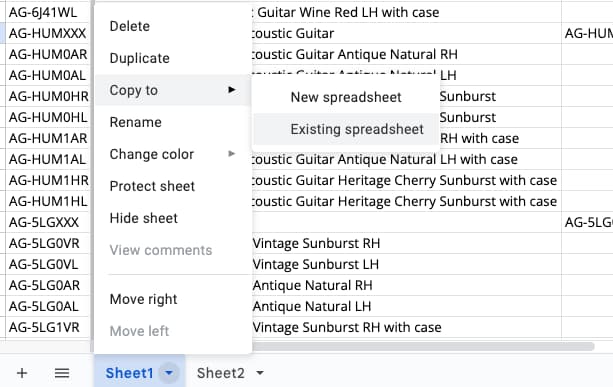
Select your master spreadsheet from the menu that appears, then click “Insert.”

All going well, the sheet you selected will now appear in your master spreadsheet with the name “Copy of [whatever your sheet is called]”, and you can repeat this process for each original spreadsheet you want to incorporate.
Combining sheets—yes or no?
In both cases, you have to decide if you want to leave your imported data as separate sheets or combine everything into one sheet, and like always, there are pros and cons to each option.
Combining your sheets will make uploading your product data to other platforms faster, sure. However, it will also mean that you have to make sure they all have the same column titles and so on before you do, which can be time-consuming. Leaving them as separate sheets is easier, but that means you’ll then need to upload each sheet individually to wherever you’re selling.
Another option is to edit the format in each original spreadsheet before importing it to your master spreadsheet. This makes it simpler for you to add all your different data to one sheet, but it’s not always possible or practical—for example, if someone else is managing that spreadsheet and using it for other purposes.
Similarly, you can also create a template for your suppliers, vendors, or anyone else to use when they send you data, but again, that’s not always an option. Apparently, data formatting is a very personal choice—who knew?
Method 2: Linking two or more spreadsheets
As mentioned, this is the other way of merging your spreadsheets. This link means that the data in your master spreadsheet will be constantly updated to reflect any changes in the original spreadsheet(s), but that you will be unable to edit anything in the master spreadsheet—it’s essentially a read-only copy.
Using the IMPORTRANGE function to link a spreadsheet to a master spreadsheet
For the IMPORTRANGE function, again, you need to have everything hosted on Google Sheets before you begin—you can’t use this function to link your master spreadsheet to a file on your computer or hosted elsewhere online (believe me, I tried).
Select the tab where you want to import your data, followed by the cell where you want the linked date to appear.
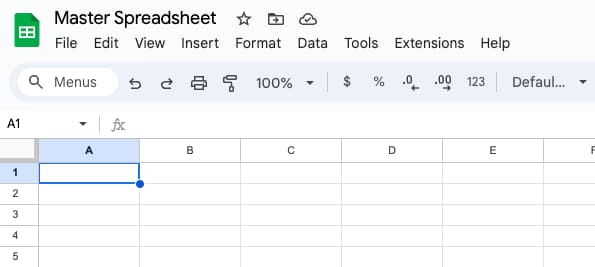
Then type your own version of the following formula, paying attention to the quotation marks, commas, exclamation mark, and spaces, and with your own URL, sheet name, and cell range:

- URL: the URL of the original spreadsheet you want to link to
- Sheet name: The name of the particular sheet within that original spreadsheet that you want to link to
- Cell range: The particular cells within that sheet that you want to link to
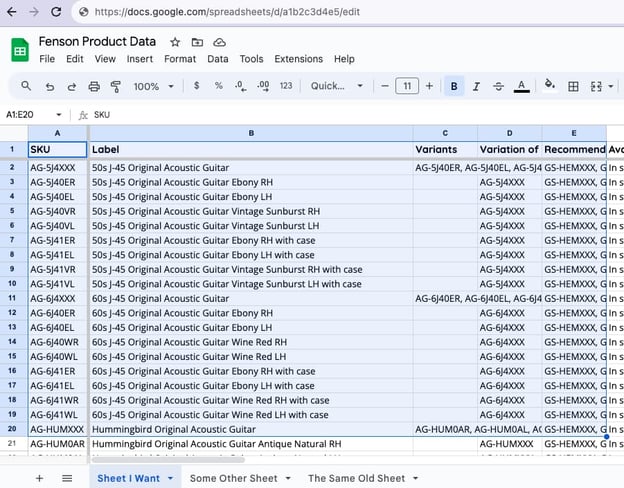
To link the cells selected here, I’d write:
=IMPORTRANGE(“https://docs.google.com/spreadsheets/d/a1b2c3d4e5/edit”, “Sheet I Want!A1:E20”)
Once this has been processed (it can take a minute), you should see a reflection in your master spreadsheet of whatever data you’ve chosen in your original spreadsheet.
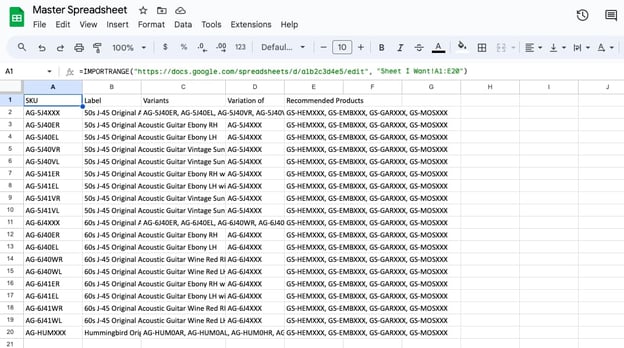
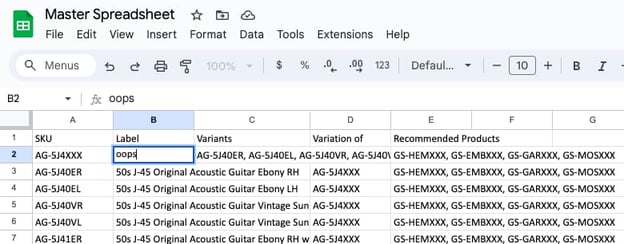
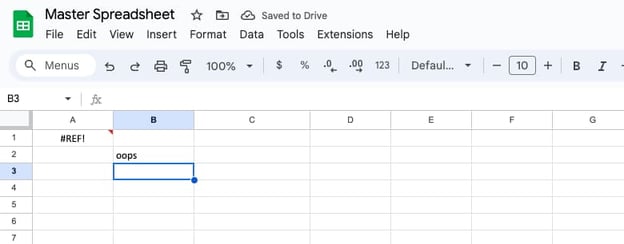
This reflection will update itself based on any changes you make in the original spreadsheet, which is a useful way to stay in sync. Be aware though—you can’t edit any of the cells that are being filled by this formula. If you do, this will happen:
Bonus step: How to export your master spreadsheet
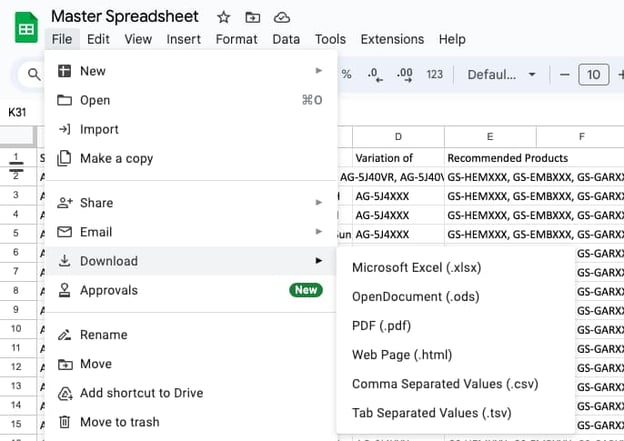
Whatever method you choose, if you’re attempting to merge product data into one spreadsheet, there’s a good chance you’ll want to export that data at some point.
Luckily, this is pretty straightforward in Google Sheets. Once you’ve merged your product data into one master spreadsheet (and edited it if you can), you can then either download it yourself as a file:
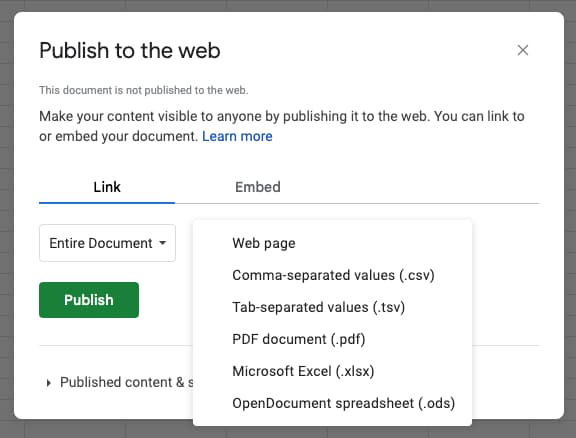
Or you can create a URL where other people or some other software/platforms can access it.
A warning to remember for each method though:
- With the copying method: anytime anything changes in your product information, you’ll need to repeat the Import/Copy Sheet process and then edit your master spreadsheet again before re-exporting.
- With the linking method: your information will stay up-to-date, but you won’t be able to make any edits in your master spreadsheet before exporting—you’ll have to make any changes in each of your original spreadsheets on an individual basis.
Pros and cons of different merging functions
On that note, here’s an overview of the advantages and disadvantages of each of the different merging functions in Google Sheets.
|
Function |
Pros |
Cons |
|
Import |
|
|
|
Copy Sheet |
|
|
|
IMPORTRANGE |
|
|
Use cases for each merging function
Based on these pros and cons, each option has its own typical use case(s) —sadly, there’s no one-size-fits-all function within Google Sheets.
- Import
- Good for: Getting product data from a variety of online and offline sources and then preparing it for export to sales channels
- Bad for: Keeping your different sources in sync
- Copy Sheet
- Good for: Collecting product data that’s already hosted on Google Drive and preparing it for export to sales channels
- Bad for: Keeping your data in sync, working with files not on Google Drive
- IMPORTRANGE
- Good for: Getting an up-to-date overview of all your product data hosted on Google Drive
- Bad for: Preparing your product data for export to sales channels/anywhere else
Alternative apps and software
One final way to simplify this whole process is by using external apps or software. For Google Sheets, browsing the Google Workspace Marketplace is a quick way to find a variety of apps to merge sheets in a more efficient way, some paid, some ad-based.
There are also much more comprehensive software solutions out there, such as PIM or Product Information Management software. Programs like this make it much faster for you to collect all of your data in one place, get it into the best possible condition once it’s there, and then send it out to everywhere that you’re selling your products whenever you need.
Frequently Asked Questions
- Copy data from an original spreadsheet into your main one.
- Link an original spreadsheet to your main one for real-time updates.

What if your product data actually worked for you?
We’ll show you how Plytix helps you stop fixing data—and start using it.
Related posts
Keep the good stuff coming
Subscribe to our blog newsletter and get monthly content that helps you manage product data smarter.
No spam. Just real value.


Think others should see this?
Go ahead and share it.