


In the fast-paced world of ecommerce and online shopping, data is king. That’s because for every product you sell, there are hundreds of possible data points. From dimensions to care instructions, materials, and descriptions, the amount of information you have for each product can quickly add up. This means that it’s crucial for your business to find a way to store and manage product data. The way that you do this can significantly impact your business’s ability to reach customers and make sales.
But what is a product database exactly? Well, a product database is the foundation of your online store. It’s a (typically digital) tool that holds all of the relevant data for the marketing, sales, and distribution of your products. One of the simplest and most used tools for managing your product data is spreadsheets.
In this comprehensive guide, we'll walk you through the steps required to set up a product database in Google Sheets, complete with tips and best practices. We'll also introduce you to alternative tools like a Product Information Management (PIM) system as an advanced alternative for managing your product data efficiently as your business scales.
Step 1: Define your data structure
The foundation of a solid product database starts with a well-structured data model. Taking the time to define which essential data points or ‘attributes’ you’ll need for your specific products will help you to ensure consistency and efficiency throughout your database.
To determine the best attributes for your database, start with the essentials and consider your product's unique characteristics. Gather all the existing information you have for your products and make sure all the necessary information is represented. Then, delve into your target audience’s preferences and industry standards.
Your attributes might include:
- Product name: the name of the product
- Description: a brief description of the product
- Material: what materials your product is made of
- Dimensions: the dimensions of your product
- SKU (Stock Keeping Unit): a unique identifier for each product
- Price: the product’s price
- Category: the category or type of product
- Product relationship: the relationship of the product to others (parent or variation)
- Inventory Quantity: the number of items available in stock
- Product Image URL: the link to the product’s images
- Supplier Information: information about the supplier of the product
- Care instructions: instructions on how to care for the product
Remember that the specific attributes you choose will depend on your business, industry, and customer needs. Gathering feedback, ensuring compliance, maintaining consistency, and prioritizing key information are additional steps for a well-defined data structure. By following these tips, you’ll be able to create a product database that not only meets your current requirements but can also adapt to the evolving demands of your business.
Step 2: Create a Google Sheet
Now that you have your data structure defined, it’s time for the easiest step: setting up a Google Sheet document.
If you’re not already familiar with Google Sheets, you can access it for free with any Google account. Here’s how to create a new spreadsheet:
- Go to Google Sheets and sign in to your Google account.
- Click on the “+ Blank” option to create a new spreadsheet.
Your new Google Sheets document will open, and now you can start labeling your columns according to the attributes you defined in Step 1.
Step 3: Import your product data
Now that you’ve defined the data you need for your products (in Step 1) and sourced it from your suppliers, manufacturers, or internal teams, it’s time to populate your spreadsheet with your product data. This step can be time-consuming, especially if you have a vast product catalog. But you’ll need patience and meticulous attention to detail during this phase to ensure data accuracy.
Here's a simplified example of what your spreadsheet might look like once you’ve imported the data:
|
Product Name |
Description |
SKU |
Price |
Category |
Inventory Quantity |
Product Image URL |
Supplier Information |
|
Product A |
This is an example product |
SKU123 |
$19.99 |
Apparel |
100 |
Image Link |
Supplier X, contact info |
|
Product B |
This is another example product |
SKU456 |
$29.99 |
Electronics |
200 |
Image Link |
Supplier Y, contact info |
|
Product C |
And yet another example product |
SKU789 |
$39.00 |
Home |
70 |
Image Link |
Supplier Z, contact info |
Enter the data for each product in the corresponding rows of your spreadsheet. Make sure you stay consistent with your formatting and double and triple-check for accuracy. If you're working from multiple sheets and need to combine information, check out this article on how to merge product information from multiple sheets.
Step 4: Data validation and quality control
As your product database starts to grow, data entry errors can become a serious issue. In order to maintain data integrity, make sure you implement data validation and quality control processes.
Here are some checks you can perform:
Duplicate entries
Duplicate entries can cause duplicate products and incorrect inventory recording. Use conditional formatting to highlight duplicate SKUs or product names. This will help you catch accidental duplicates.
A quick way to do this is by selecting the column that you want to check for duplicates. Then, click “Format” in the top navigation bar, followed by “conditional formatting”. By doing this, a box on the right-hand side of the screen will appear, and you’ll see a prompt labeled “Format cells if…” Click that and scroll to the bottom, selecting “custom formula is.”
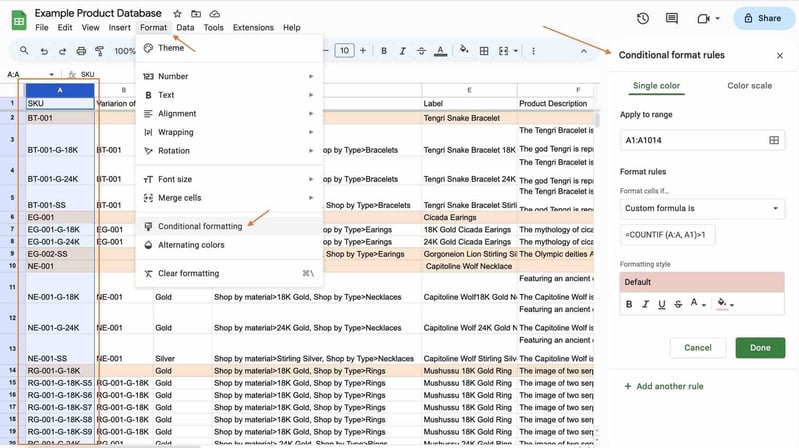
You can then use the ‘COUNTIF” formula to look for duplicates. If we use column A as our example, our formula will be [=COUNTIF (A:A, A1)>1].
This tells the sheet where to look for duplicates. The information in the parentheses represents the column you want to track and the specific cell you want to start with. The information outside the parentheses states that you want the sheet to count duplicates or anything appearing more than once (>1).
Missing information
Missing information within your spreadsheet can result in products with incomplete information making it out to customers. To avoid this, you’ll want to check for missing data in any of the columns, such as empty product descriptions or missing prices.
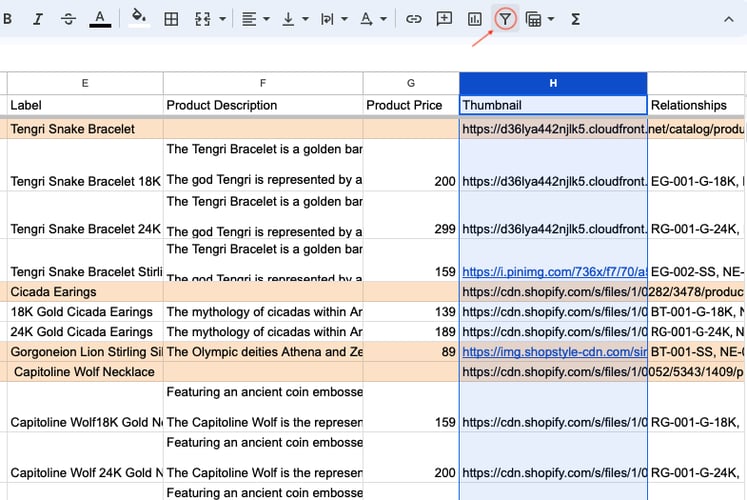
A simple way to do this is to set up a filter for your columns. Simply highlight the column you want to check and select the funnel icon in the top navigation bar.
You now have a filter applied. Simply click on the filter icon that’s now located next to the column you selected previously. Click “clear” and then select “blanks” and “ok.”
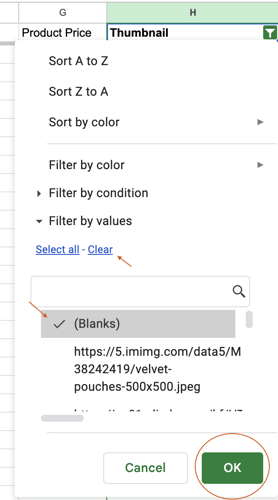
Your sheet will now show you any blank or missing information from your selected area.
Consistent formatting
You’ll also want to ensure that all data is formatted consistently. For example, using the same currency format for prices and making sure all images are in the same format (URLs or local file paths).
From here, you’ll need to regularly review and clean your data to avoid issues in the future.
Step 5: Categorization and Taxonomy
Categorizing your products logically is essential for organization and an improved customer shopping experience. Create categories or hierarchies to group similar products together. In Google Sheets, you can create a separate column for "Category" and enter the appropriate category for each product.
|
SKU |
Color |
Description |
Category |
|
001 |
Grey |
This is a description |
Outdoors & Sports > Camping Gear > Tents |
|
002 |
Black |
This is also a description |
Outdoors & Sports > Camping Gear > Sleeping bags |
|
003 |
White |
This is a description too |
Outdoors & Sports > Camping Gear > Camp Cookware |
For example, if you run an ecommerce store offering a range of outdoor equipment, you could consider the following categorization:
- Outdoors & Sports
- Camping Gear
- Tents
- Sleeping Bags
- Camp Cookware
- Hiking Equipment
- Backpacks
- Hiking Boots
- Water Bottles
- Biking Accessories
- Bicycles
- Helmets
- Bike Accessories
- Water Sports
- Kayaks
- Life Vests
- Paddles
- Camping Gear
This step is critical for improving navigation and helping customers easily find what they're looking for. By establishing logical categories or hierarchies, you can group similar products together, making it easier for customers to find the products they want.
Step 6: Enrich your product information
Having complete and rich product data will provide a better shopping experience for your customers, leading to higher conversions. Did you know that 98% of shoppers decide against making a purchase when they notice incomplete or inaccurate product content? This means that including images, videos, and more detailed specifications can directly affect the success of your sales.
In Google Sheets, you can include links to product images or videos in your spreadsheet. For detailed specifications, you can create additional columns or use a cell to provide more information.
Here's how it might look in your spreadsheet:
|
Product Name |
Description |
SKU |
Price |
Category |
Product Image URL |
Product Video URL |
Product Specifications |
|
Product A |
This is an example product |
SKU123 |
$19.99 |
Apparel |
Image link |
Video link |
Link to specs |
Enriching your product data enhances the shopping experience and provides customers with more information to make informed (and more frequent) purchasing decisions.
Step 7: Export and share your data
Once you've completed the setup of your product database in Google Sheets, you can export the spreadsheet in the various formats you may need for your team or sales channels, such as CSV or Excel.
To export your Google Sheets document:
- Click on "File" in the top left corner.
- Select "Download."
- Choose the format you'd like to export (e.g., Microsoft Excel, PDF, CSV).
By exporting and sharing your product database, you’ll be able to integrate it into your ecommerce website, point-of-sale systems, and other sales channels.
Step 8: Consider a better way…

If you’ve come this far, you might be fed up with some of the tediousness of managing your database in spreadsheets. While spreadsheets are a valuable tool for managing product data, they're not without their limitations, especially as your business grows. As your product catalog expands, you may find it increasingly difficult to maintain data accuracy and consistency with Google Sheets.
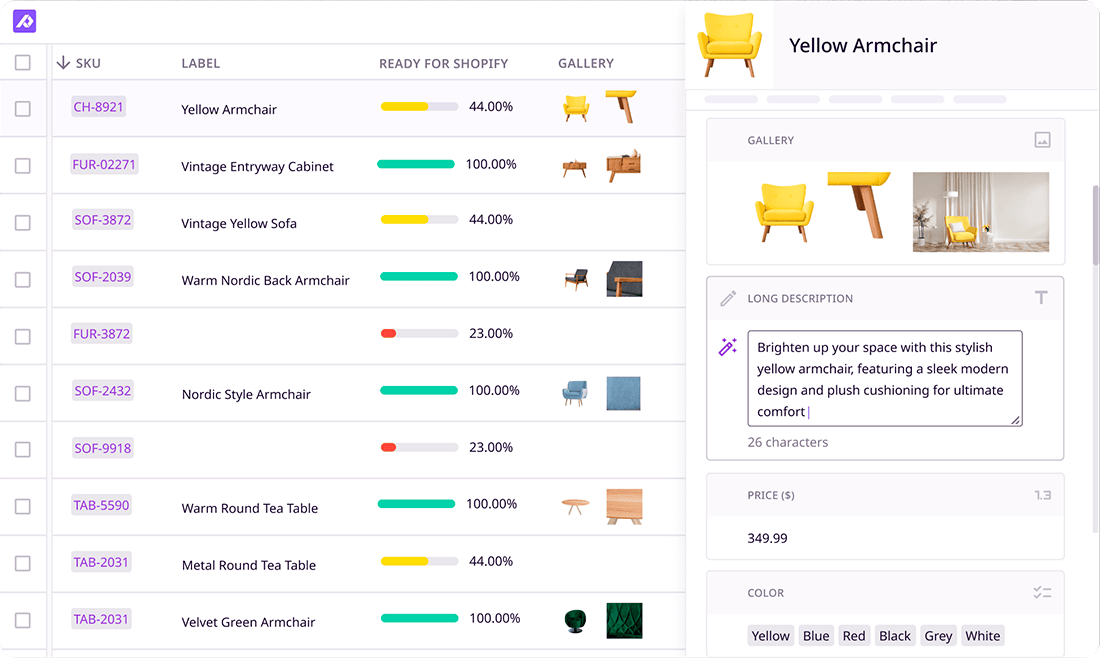
PIM Software
This is where Product Information Management (PIM) software stands out as an advanced alternative. PIM is software that is specifically designed with data and ecommerce businesses in mind. A PIM will offer a centralized and user-friendly platform with which you can manage, enrich, and distribute your product data much more efficiently.
Here are some of the benefits of using PIM:
- Bulk editing: With a PIM tool, searching, editing, and replacing old data is as easy as making a few clicks. You can simply use a bulk edit tool to make changes to thousands of products simultaneously.
- Quality assurance: Remember those pesky formulas to make sure incomplete or incorrect product data didn’t escape your spreadsheet? Well, with Plytix PIM, you can use a feature called ‘completeness attributes,’ which works like a checklist to ensure only product information that’s 100% ready can be sent out to sales channels.
- Image Management: Managing product images with a PIM can be seamless. You won’t need any other digital asset management system (like Dropbox or Google Photos) because, with most PIMs, you can upload, organize, and store all your digital assets right from within the platform.
- Team Collaboration: Collaborating with your team is easy with PIM. Not only do you no longer have to worry about multiple copies of the same spreadsheet or your columns and views being distorted when your colleague makes changes. But with Plytix, you have unlimited users who can work on your product database simultaneously without causing any disturbances.
So, what’s next?
Building a product database in Google Sheets is an excellent starting point, particularly for businesses with smaller product catalogs. The simplicity and accessibility of Google Sheets make it a valuable tool for product data management. However, as your business expands, managing product data in spreadsheets can become challenging, time-consuming, and error-prone.
With Plytix PIM, there’s a solution to these challenges, allowing you to save time, reduce errors, and scale your product data management efficiently. Whether you're just starting or looking to upgrade your product data management processes, PIM can help take your business to the next level. With the right tools and processes in place, your product data will become a strategic asset that drives your success in the competitive world of ecommerce.
If you’d like to know more about how PIM can help your business, why not check out our free ebook all about how PIM adopters are outperforming their competition?

What if your product data actually worked for you?
We’ll show you how Plytix helps you stop fixing data—and start using it.


Think others should see this?
Go ahead and share it.